Code · LUTzy · Build notes
How LUTzy's reverse-LUT works
LUTzy can take a RAW file and the JPEG the camera made of the same frame, and turn the difference between them into a .cube LUT. Here's what it does, step by step, and where it's rough.
§ The idea
I built LUTzy because I wanted to roll my own way of using LUTs. This page is about one piece of it: making a LUT from a photo the camera has already processed.
A camera's JPEG is the RAW plus the manufacturer's look: its color science, or whatever picture profile was switched on. If you develop the RAW neutrally and lay it over the JPEG, every pixel is a small fact: this neutral color came out as that JPEG color. Collect enough of those facts and you can fill in a 3D LUT that does the same thing to any other RAW.
In LUTzy it's File ▸ Derive LUT from JPG… (⌘D). Pick the RAW, pick the JPEG, and hit Derive. The rest of this page is what happens after that. All of it lives in one file, RecipeExtractor.swift.
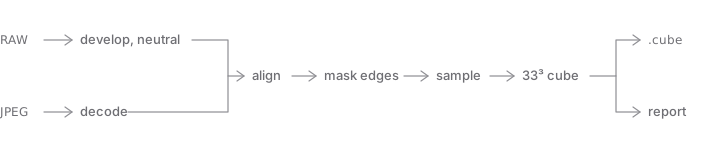
.cube and a report.§ 1. Start from the same neutral develop
The LUT is a transform from "the RAW as LUTzy renders it" to "the JPEG". So the RAW side has to be the same render LUTzy uses everywhere else. It's Core Image's CIRAWFilter with nothing changed: no exposure, no white balance tweak, none of the Develop sliders.
That last part matters. If your develop settings leaked into the derive, the LUT would bake them in, and then apply them a second time on top of the same settings later. A test reads the source to make sure the derive function can't even be handed your develop settings.
The JPEG is decoded with its EXIF orientation applied. An early version didn't do that, so a portrait JPEG got compared sideways against an upright RAW, and the whole derive sampled pixels that had nothing to do with each other. That got fixed before the first release.
§ 2. Make the two images line up
First, a sanity check. The RAW and the JPEG have to be the same shape, with aspect ratios within 1% of each other. The pixel sizes can differ. If the shapes don't match (an in-camera crop mode, a rotated JPEG, or just the wrong file), LUTzy refuses rather than stretching one onto the other and producing a nonsense cube behind a plausible-looking report.
Then both images are Lanczos-scaled onto one working size: the JPEG's dimensions, capped so the long edge is at most 3,000 pixels. The first version worked at full resolution and held three full-size buffers at once (RAW, JPEG, and a blurred JPEG). On a 60-megapixel pair that's around 700 MB. Sampling is statistical, so 200,000 samples from a 3,000-pixel image describe the color mapping as well as 200,000 from a 9,000-pixel one. On a 16-megapixel test pair the cap took peak memory from 403 MB to 238 MB, and the results barely moved.
Last, alignment. The camera's JPEG and Core Image's develop don't always crop the sensor identically, so the two can be off by a pixel or two. LUTzy takes a patch from the center of each (up to 512 pixels square), converts it to brightness, and tries every shift up to 4 pixels in each direction. The shift where the two patches correlate best wins. It's brute force and whole pixels only, and it's fast because the patch is small.
§ 3. Keep sharpening out of the colors
Cameras sharpen their JPEGs, and sharpening changes colors right at edges: halos, brightened rims, darkened troughs. A LUT can't sharpen, so if those pixels went into the cube they'd just teach it wrong colors.
So LUTzy blurs the JPEG with a small box blur (radius 3) and compares it to the original. Where a pixel differs from its blurred self by more than 2 levels out of 255 in any channel, it's treated as an edge and skipped. What's left is the flat, smooth parts of the frame, where the JPEG's color is the camera's color and not its sharpening.
§ 4. Sample and fill the cube
The cube is 33×33×33, a common size for .cube LUTs: 35,937 lattice points, each holding an output color. LUTzy draws random pixel positions, up to 2 million of them, and keeps the ones that pass the edge mask, stopping once it has 200,000.
For each kept pixel, the neutral RAW color says which lattice point it belongs to (rounded to the nearest one), and the JPEG color at the same spot gets added to that point's running total. Here's the core of it, trimmed:
// Which lattice point does the neutral pixel land on?
let cr = min(cubeN - 1, max(0, Int(nrF * cubeNF + 0.5)))
let cg = min(cubeN - 1, max(0, Int(ngF * cubeNF + 0.5)))
let cb = min(cubeN - 1, max(0, Int(nbF * cubeNF + 0.5)))
let idx = cr + cg * cubeN + cb * cubeN * cubeN

// Add the JPEG's color for that same pixel to the cell.
stats.sums[idx] += SIMD3<Float>(jrF, jgF, jbF)
stats.counts[idx] += 1
At the end, each cell's total is divided by its count, and that average is the cell's output color. Both images are read as 8-bit sRGB for this, and the derived LUT is applied in sRGB too, so the space it was fit in is the space it's used in.
§ 5. Fill the holes
One photo covers a tiny slice of the color cube. On a 16-megapixel test pair, about 2.5% of the cells got a direct sample, roughly 900 out of 35,937. Real photos don't contain every possible color, and most of the cube is colors no camera will ever hand you in one frame.
So the empty cells get filled in two passes. First, eight rounds of pulling from neighbors: any empty cell next to filled cells (counting all 26 around it in 3D) takes their average and counts as filled for the next round. That spreads the measured colors out to cells near them. Anything still empty after eight rounds gets the identity value, meaning that color passes through unchanged.
The practical upshot is that a derived LUT knows the colors that were in the frame you gave it, and guesses everywhere else. So pick a frame with some dynamic range, with real highlights, midtones and shadows in it, so you can see how the camera's look treats each of them. A flat, evenly lit frame only teaches it the middle. The report's coverage number tells you how much it actually saw.
§ 6. The report
Alongside the cube, LUTzy writes a report from the same samples:
- Tone curve. The samples are binned into 16 brightness levels by the neutral render, and each bin shows the average JPEG red, green and blue. Plotted against a straight line, it shows where the camera lifts shadows or rolls off highlights.
- Saturation. How far the JPEG's colors sit from gray, on average, compared with the neutral render. 1.0 means no change; above 1 means the camera boosted saturation.
- Sharpening. High-frequency energy in the JPEG divided by the same in the neutral render, using the same measurement on both (the squared difference between each pixel's left and right neighbors) at the same pixels, edges included, since that's where sharpening lives. An early version measured the two sides differently, so the ratio meant nothing; that's fixed. It's measured, never applied: a cube can't sharpen, and LUTzy doesn't have a second stage that does.
- Coverage, sample count and alignment. How many cells got direct samples, how many pixels were used, and the shift the aligner found.
- Camera EXIF. Make, model, software, and the EXIF contrast, saturation, sharpness, white balance and custom-rendered tags. Ricoh, for one, keeps the name of its Image Control profile in its own maker notes, which macOS's ImageIO doesn't decode, so that name doesn't show up.
§ 7. Writing it out
The cube is written as a plain .cube text file, the format most color tools read:
# Generated by LUTzy
TITLE "IMG_0042_recipe_33_Rec709"
LUT_3D_SIZE 33
DOMAIN_MIN 0.0 0.0 0.0
DOMAIN_MAX 1.0 1.0 1.0
0.000000 0.000000 0.000000
…
It's named after the JPEG, with the cube size and the _Rec709 ending that downloadable camera LUTs usually carry. LUTzy drops that ending when it shows the name. Every value is clamped to 0–1 and written to six decimal places. The new LUT previews right away on the current image, but it stays in memory until you choose Save to LUT Folder…, so experiments don't pile up in your LUT library.
Getting that in-memory LUT to show up turned out to be its own bug. LUTzy identified the first derived LUTs by the path of their temporary file, which no library scan would ever find, so a successful derive left the preview ungraded with nothing selected. The fix gives a derived LUT an ID made from a hash of the cube itself, and keeps derived LUTs in a small registry the app checks before the library. That bug sat on the main branch for a while, but it was fixed before the first release.
One more quirk: the sampling uses a random number generator, so deriving the same pair twice gives two very slightly different cubes.
§ What it can't do
- Anything that depends on where a pixel is rather than what color it is. That rules out sharpening, noise reduction, vignetting, and local tone mapping. A LUT only sees colors.
- Colors that weren't in the frame. Those cells are filled from neighbors or left as identity.
- Match exactly anywhere but a neutral develop. The cube maps one specific input, macOS's default RAW develop in sRGB, to the camera's JPEG. In LUTzy it's applied after your develop and adjustments, so it matches the camera only when those are left at neutral. Other apps develop RAWs their own way, so there the
.cubeis a starting point, not an exact match. It's also built for display-ready sRGB input, not log footage. - Sub-pixel alignment. The aligner works in whole pixels, which is fine once the edges are masked out, but it's a simplification.
§ Try it
LUTzy is free and open source under MIT, and runs on macOS 26. Download it from GitHub, or read the extractor's source. There's more about the app itself on the LUTzy page.